

The Ultimate Guide to Storing and Managing Farm Fresh Eggs
 Farm fresh eggs are delightful, providing rich flavor and superior nutritional value compared to store-bought eggs. However, proper storage and management are crucial to ensure their freshness and safety. Here’s everything you need to know about handling farm fresh eggs.
-
Collecting the Eggs
- Frequency: Collect eggs at least once daily, preferably in the morning and evening. This helps to prevent eggs from becoming dirty or damaged.
- Clean Hands: Always wash your hands before and after collecting eggs to maintain hygiene and prevent contamination.
- Gentle Handling: Handle eggs with care to avoid cracks. Use a clean basket or container for collection.
-
Cleaning the Eggs
- Dry Cleaning: If the eggs are relatively clean, it’s best to simply wipe off any dirt with a dry cloth or a brush. This helps maintain the protective bloom (a natural coating that keeps bacteria out).
- Wet Cleaning: For heavily soiled eggs, use warm water (not hot) to gently wash them. Avoid soaking the eggs, dry them right away with a clean cloth, and immediately refrigerate any washed eggs.
-
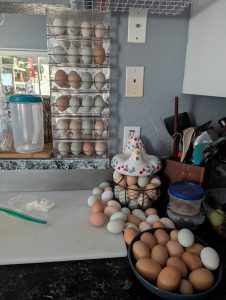
Storing the Eggs
- Refrigeration: If you purchased eggs that were refrigerated, store eggs in the refrigerator to prolong their freshness. Place them in an egg carton to protect them from absorbing odors and flavors from other foods. Keep the eggs at a consistent temperature of around 40°F (4°C). Avoid frequent temperature changes, as this can cause condensation and promote bacterial growth.
- Fresh Farm Eggs – Most places outside the USA: When eggs are laid by the chicken they are coated in “bloom”. This layer on the outside of the shell acts as a barrier to bacteria and dirt keeping the egg inside the shell protected. Water will disrupt the bloom and allow for the absorption of bacteria into the eggs interior. If your freshly collected eggs are clean you can store them at room temperature for weeks. If you wash your eggs they need to be in the refrigerator. Never place unwashed eggs into the refrigerator, even if they seem clean. Condensation in the refrigerator will disrupt the bloom allowing any bacteria on the shell surface to penetrate the egg.
- Pointy End Down: Store eggs with the pointed end facing downwards. This prevents the air inside the ago from floating up and through the egg which helps maintain the integrity of the yolk.
-
Checking Freshness
- Some people will tell you to float your eggs to determine freshness but there are too many reasons why a good egg will float. ALWAYS crack your farm fresh egg into a small bowl before adding it to a pan or using it as an ingredient. You can easily spot a bad egg once it’s cracked.
-
Managing Eggs for Use
- First In, First Out (FIFO): Use the oldest eggs first to ensure none go to waste. Mark the collection date on each egg or carton to keep track.
- Egg Rotation: Regularly rotate your eggs in storage to prevent any from sitting too long. This helps ensure you’re always using the freshest eggs.
-
Safety Tips
- Cracked Eggs: Discard any eggs with cracks, as bacteria can easily enter through the cracks and contaminate the egg.
- Cook Thoroughly: Always cook eggs thoroughly to reduce the risk of foodborne illnesses. Avoid consuming raw or undercooked eggs, especially if they are not from a trusted source.
Extra Tips
- Shells for Composting: Don’t throw away eggshells. They can be crushed and added to your compost pile to provide valuable nutrients for your garden.
- Preserving Eggs: If you have an abundance of eggs, consider preserving them using methods such as freezing, pickling, or dehydrating.

Freezing eggs is a great way to preserve them for future use. Here’s a step-by-step guide on how to freeze eggs:
- Preparation
- Clean Eggs: Ensure the eggs are clean before starting. You don’t need to wash them if they’re farm fresh, but remove any visible dirt.
- Crack the Eggs: Never freeze eggs in their shells. Crack the eggs into a clean bowl.
- Freezing Whole Eggs
- Beat Lightly: Lightly beat the eggs just until the yolks and whites are combined. Avoid overbeating.
- Optional Additives: To preserve texture, you can add a pinch of salt or sugar. Use salt if you’re planning to use the eggs in savory dishes and sugar for baking.
- Freezing Egg Yolks and Whites Separately
- Egg Yolks: To prevent egg yolks from becoming too gelatinous, you can add a pinch of salt or sugar before freezing. Blend lightly.
- Egg Whites: Pour the whites into a container. Whites freeze well without any additives.
- Storage
- Containers: Pour the beaten eggs or yolks/whites into ice cube trays or silicone molds for easy portioning. Once frozen, transfer the cubes to freezer-safe bags or containers.
- Labeling: Label the bags or containers with the date and any additives used.
- Thawing and Using Frozen Eggs
- Thawing: Place the frozen eggs in the refrigerator to thaw overnight. Avoid thawing at room temperature to prevent bacterial growth.
- Usage: Use thawed eggs as you would fresh eggs in cooking or baking. Note that frozen eggs are best used in cooked dishes rather than raw preparations like meringues.
Pickling eggs is a fantastic way to preserve them and add some delightful tang to your snacks or meals. Here’s a step-by-step guide on how to pickle eggs:
Ingredients
- 12 hard-boiled eggs, peeled
- 1 1/2 cups white vinegar
- 1/2 cup water
- 1/2 cup sugar
- 1 tablespoon salt
- 1 teaspoon black peppercorns
- 1 teaspoon mustard seeds
- 1 teaspoon dill seeds (optional)
- 2-3 garlic cloves, peeled and smashed
- 1 small onion, thinly sliced
- Optional: beet juice for pink pickled eggs, or other spices for additional flavor
Instructions
- Hard-Boil the Eggs:
- Place the eggs in a single layer in a large saucepan.
- Cover with cold water and bring to a boil over medium-high heat.
- Once boiling, reduce heat and let simmer for 10 minutes.
- Remove eggs from heat, cool under cold running water, and peel.
- Prepare the Pickling Brine:
- In a medium saucepan, combine the white vinegar, water, sugar, salt, black peppercorns, mustard seeds, dill seeds (if using), garlic, and onion.
- Bring the mixture to a boil, stirring occasionally to dissolve the sugar and salt.
- Reduce heat and let simmer for about 5 minutes.
- If you want to add beet juice for color, you can add it to the brine now.
- Pack the Eggs:
- Place the peeled hard-boiled eggs into a clean, sterilized glass jar or jars.
- Pour the hot brine over the eggs, ensuring they are fully submerged.
- If needed, use a clean spoon to push the eggs down and remove any air bubbles.
- Seal and Store:
- Seal the jar(s) tightly with lids.
- Allow the jar(s) to cool to room temperature.
- Once cooled, refrigerate the pickled eggs.
- Wait and Enjoy:
- Let the eggs pickle in the refrigerator for at least 1 week before eating. The longer they sit, the more flavorful they become.
- Pickled eggs can be stored in the refrigerator for up to 3 months.
Serving Suggestions
-
-
- Enjoy them as a tangy snack straight from the jar.
- Slice them and add to salads or sandwiches.
- Use them as a garnish for cocktails or appetizer platters.
-
Dehydrating eggs is a great way to preserve them for long-term storage. Here’s a step-by-step guide on how to dehydrate eggs:
Ingredients and Equipment
- Fresh eggs
- Mixing bowl
- Fork or whisk
- Dehydrator or oven with low temperature settings
- Non-stick sheets or parchment paper
- Blender or food processor (optional)
- Airtight containers for storage
Instructions
- Preparation
- Crack and Beat Eggs: Crack the eggs into a mixing bowl. Beat them with a fork or whisk until the yolks and whites are thoroughly combined.
- Dehydrator Method
- Spread the Eggs: Pour the beaten eggs onto non-stick sheets or parchment paper placed on dehydrator trays. Spread the eggs into a thin, even layer.
- Set the Dehydrator: Set the dehydrator to 135°F (57°C) and let it run for 8-12 hours, or until the eggs are completely dry and brittle.
- Check for Doneness: Eggs should be fully dry and brittle with no moisture remaining. If not fully dry, continue dehydrating.
- Oven Method
- Spread the Eggs: Pour the beaten eggs onto a non-stick baking sheet or a baking sheet lined with parchment paper. Spread them into a thin, even layer.
- Set the Oven: Preheat the oven to the lowest temperature setting, usually around 140°F (60°C).
- Drying Process: Place the baking sheet in the oven and let the eggs dry for 8-12 hours, or until they are fully dry and brittle. Check periodically to ensure even drying.
- Powdering the Eggs
- Blend the Eggs: Once the eggs are completely dry and brittle, break them into smaller pieces and place them in a blender or food processor. Blend until they form a fine powder.
- Optional Sifting: If you prefer a finer texture, you can sift the powdered eggs to remove any larger pieces.
- Storage
- Store in Airtight Containers: Transfer the powdered eggs to airtight containers, such as jars or vacuum-sealed bags.
- Label and Date: Label the containers with the date of preparation and store them in a cool, dry place. Properly stored dehydrated eggs can last for up to a year.
Using Dehydrated Eggs
- Rehydrate: To rehydrate the eggs, mix 1 tablespoon of egg powder with 2 tablespoons of water. Let it sit for a few minutes before using.
- Cooking: Use rehydrated eggs in any recipe that calls for eggs. They work well in baking, scrambling, and more.
By following these guidelines, you can ensure that your farm fresh eggs remain delicious, safe, and ready to enjoy. Happy egg collecting!